Beyond Prompting: RAG with Microsoft Foundry and FoundryIQ
RAG has become a common term in modern AI discussions but what does it actually mean?
RAG stands for Retrieval Augmented Generation. In simple terms, it is a technique that allows large language models (LLMs) to generate answers using external knowledge, rather than relying only on what was learned during model training.
Let’s make this easier to understand with a concrete example.
Imagine a user asks an AI agent:
“Can you summarize yesterday’s meeting?”
An LLM on its own cannot answer this question. It doesn't have access to your meeting transcripts, does not retain memory of past conversations or internal documents by default.
What actually happens
- The agent analyzes the user’s intent.
- It retrieves the relevant meeting transcript from an external data source.
- The retrieved content is then augmented into the prompt.
- The augmented prompt is sent to the LLM, which generates a response grounded in that retrieved information. This retrieval-and-augmentation step is what enables the model to produce accurate, context-aware answers—and this is the core idea behind RAG.
Oh yeah!, that's how RAG work.
What We Are Building
In this post, we will build a Retrieval Augmented Generation (RAG) solution using Microsoft Foundry, grounded on data from the Coffee Shop Menu.
Specifically, we will
- Ingest and index the data into a vector store
- Use FoundryIQ to orchestrate retrieval, reasoning, and prompt augmentation
- Create a Foundry Agent capable of answering questions based strictly on the prepared dataset
- The end result is an AI agent that does not rely on generic model knowledge, but instead produces grounded, data driven responses derived from SET information. This architecture enables accurate answers to analytical questions while maintaining control over data scope, relevance, and governance.
Here is how the end result will look like:
In the next section, we will walk through the architecture and explain how each component works together, step by step.
Architecture
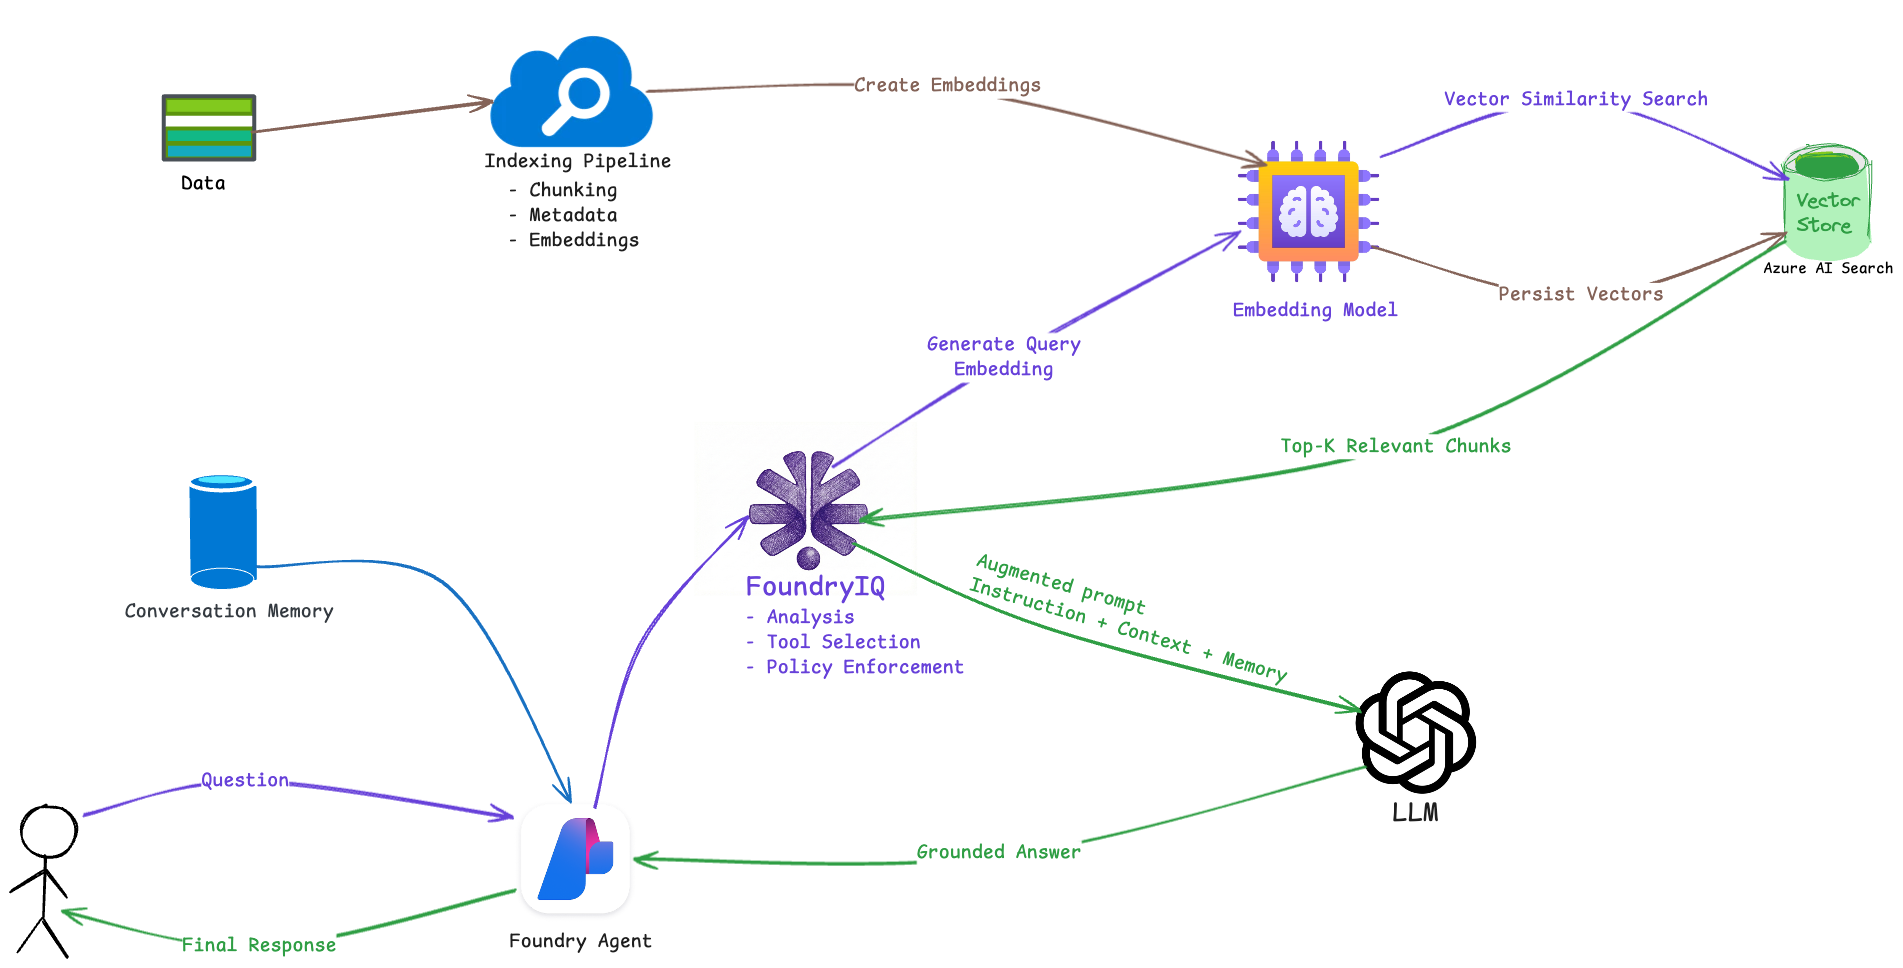
Here is the flow of operations
1. Offline Knowledge
- Data is processed through an indexing pipeline:
- Documents are chunked into semantically meaningful units
- Metadata such as symbol, period, and document type is attached
- Each chunk is converted into a vector using a shared embedding model
- Vectors and metadata are persisted in Azure AI Search
This step runs independently from user interaction and establishes the knowledge base.
2. User Interaction and Agent
When a user asks a question, the request is received by a Foundry Agent. The agent maintains short term conversation memory, including recent exchanges and session context.
3. Reasoning and Retrieval Orchestration (FoundryIQ)
FoundryIQ analyzes the user’s intent and determines whether retrieval is required. If so, the user query is converted into an embedding using the same embedding model A vector similarity search is executed against Azure AI Search The top-K most relevant chunks, along with metadata, are returned FoundryIQ then assembles an augmented prompt that includes:
- System and agent instructions
- Retrieved context from data
- Relevant conversation memory
- Policy and grounding constraints
4. Grounded Answer Generation
The augmented prompt is sent to the LLM. Because the model is explicitly grounded in retrieved data, the response is constrained to factual, auditable information rather than generic model knowledge.
5. Response Delivery
The grounded response is returned to the Foundry Agent and delivered to the user. The interaction may also update conversation memory for follow-up questions.
Now we done with theory and architecture part, let's get our hands dirty!
Prerequisites
- Data Set
- An Azure subscription with appropriate permissions
The Stack
- Microsoft Foundry
- Azure AI Search
- Storage Account
A little bit about Data Set
For this demo, I mocked up menu and and price in text files. This meants to demonstrate that text file could be used to vectorize the data with FoundryIQ.
Implementation
1. Create Foundry Resource (The Backend)
- Create new Resource Group called
rg-foundry-xxxxx. - Create new Microsoft Foundry Resource
Resourc name :foundry-eus-xxxxx
Region: The same as Resource Group location
Default project name: proj-xxxxx
2. Deploy LLM (Large Language Model)
-
Go to Foundry Resource > Overview > Go to Foundry Portal
-
Make sure you have
New Foundrytoggle on. This will bring you to the New Foundry Portal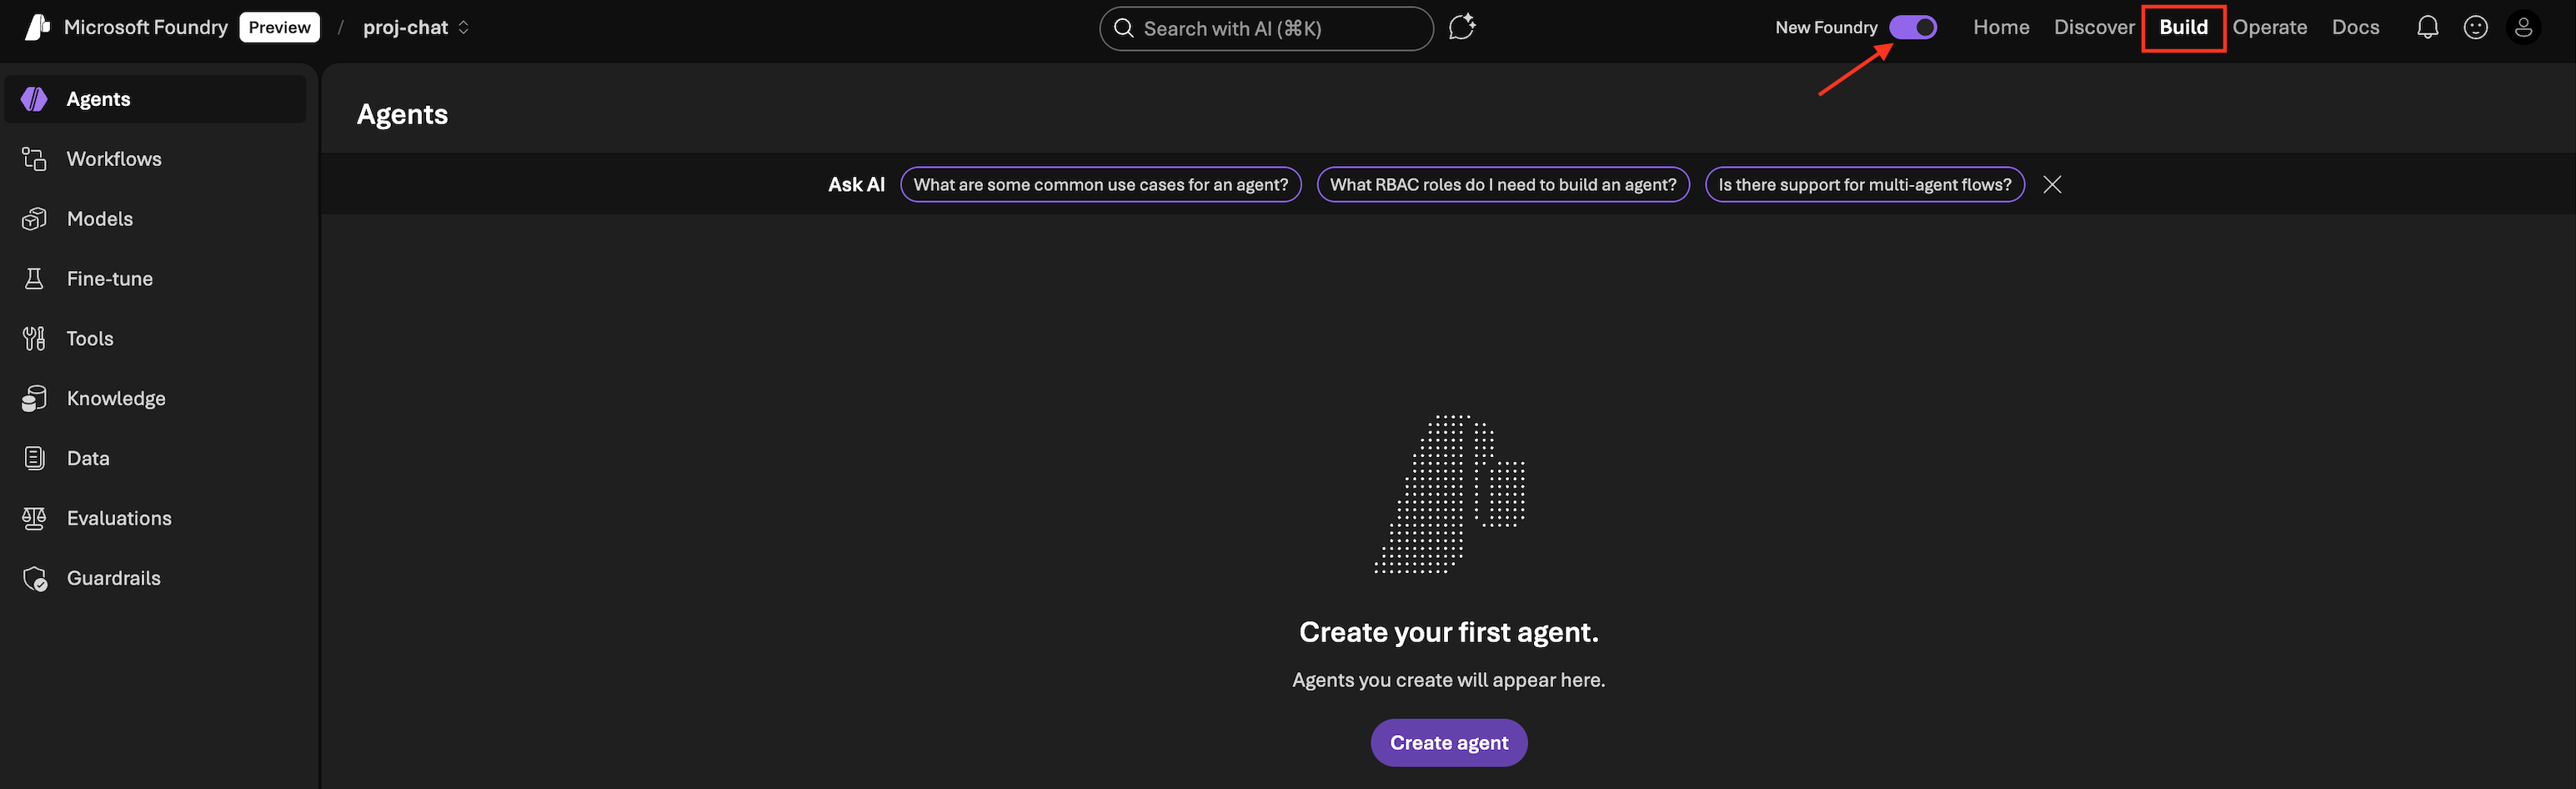
- Click
Build - On the left panel: Select
Models>Deploy a base model - You will see that Foundry has more than 11K models available. Search for
gpt-4oand select it. - Click
Deploy>Default settings> Deploy - Once deployment completed, it might bring you to create an Agent. Please go to back
Modelspanel.
We need to deploy another model for Embedding model
- On the left panel: Select
Models>Deploy a base model - Search for
text-embedding-ada-002and select it. - Click
Deploy>Default settings> Deploy
3. Create Storage Account
- In Azure Portal, Create > Storage Account in the same resource group and same location.
- Go to Storage browser > Blob containers > Add container >
name: moderngolf-coffee-menu> Create - Go inside
moderngolf-coffee-menuBlob container just created. - Click
Uploadand upload the extrected compress file Data Set
4. Create Azure AI Search
-
In Azure Portal, Create > Azure AI Search
* Price tier, Choose
BasicTier or above to be able to use Foundry IQ Knowledge Base feature. SKU F which is Free tier. It doesn't support Sementic search. -
Review > Create
- In Azure AI Search Resource, Go to Settings > Identity
- In System assigned tab, Status > Turn on
This is going to register managed identity for AI Search resource, so we can use Azure RBAC to give permission
Give permission to Foundry Project to read Index Data (Permission for AI Agent)
- Go to Access control (IAM) > Add role assgignment >
- Search for
Search Index Data ReaderClick Next - Assign access to
Managed Identity> Select yourFoundry Projectidentity - Click Review + Assign
5. Grant AI Search Permission to Storage Account
- Go back to Storage Account we just created
- Go to Access control (IAM) > Add > Add role assignement
- Search for role name
Storage Blob Data Reader> Select it > Click Next - In Assign access to > Select
Managed identity - In Members +Select members > Search for
YOUR AZURE AI SEARCH NAME(it's the managed identity for AI Search resource) - Select > Review + assign
6. Knowledge (FoundryIQ)
- Go to Foundry Resource > Overview > Go to Foundry Portal
- In Foundry console, go to
Buildmenu >Knowledgepanel - In
Azure AI Search resourceSelect AI Search resource we created earlier and Connect
*What happen here is that Foundry is connecting the Tools AI Search for this resource. *
- Once it's done click on
Create a knowledge base - Choose a knowledge type :
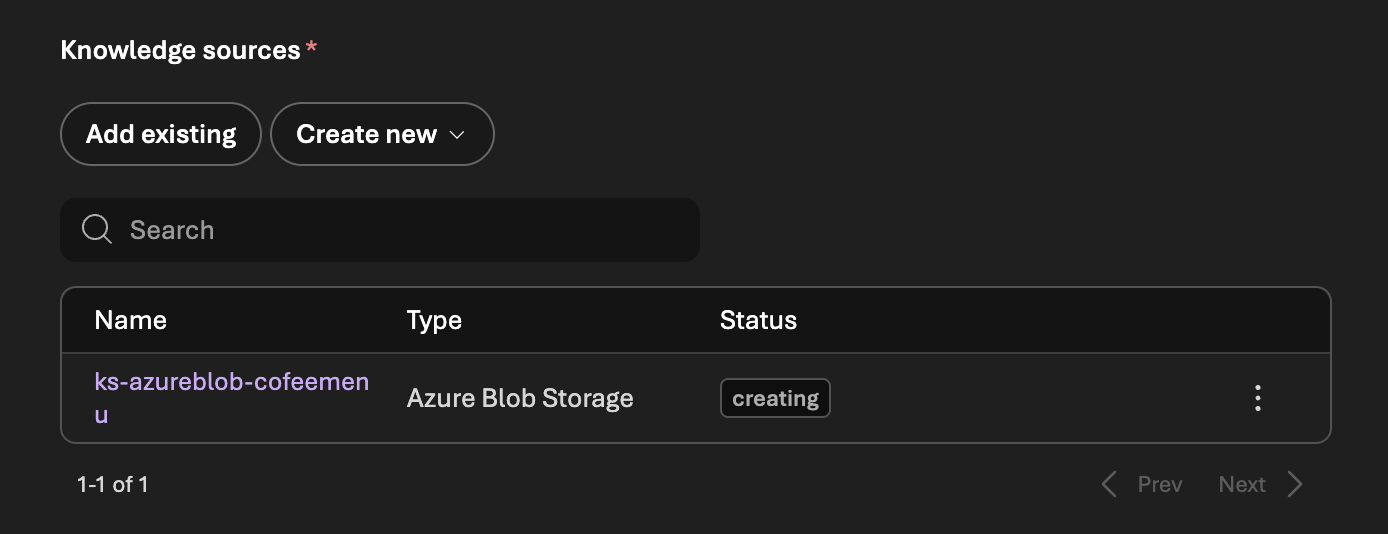
Azure Blob Storage - Create a knowledge source
Name: `ks-azureblob-cofeemenu`
Storage account: `[SelectYourStorageAccount]`
Container name : `moderngolf-coffee-menu`
Authentication type: `System assigned identity`
Embedding model : `text-embedding-ada-002`
Chat completions model: `gpt-4o`
It will take few minutes to prepare the knowledge
While Knowledge is creating, Foundry is preparing vector index in AI Search resource.
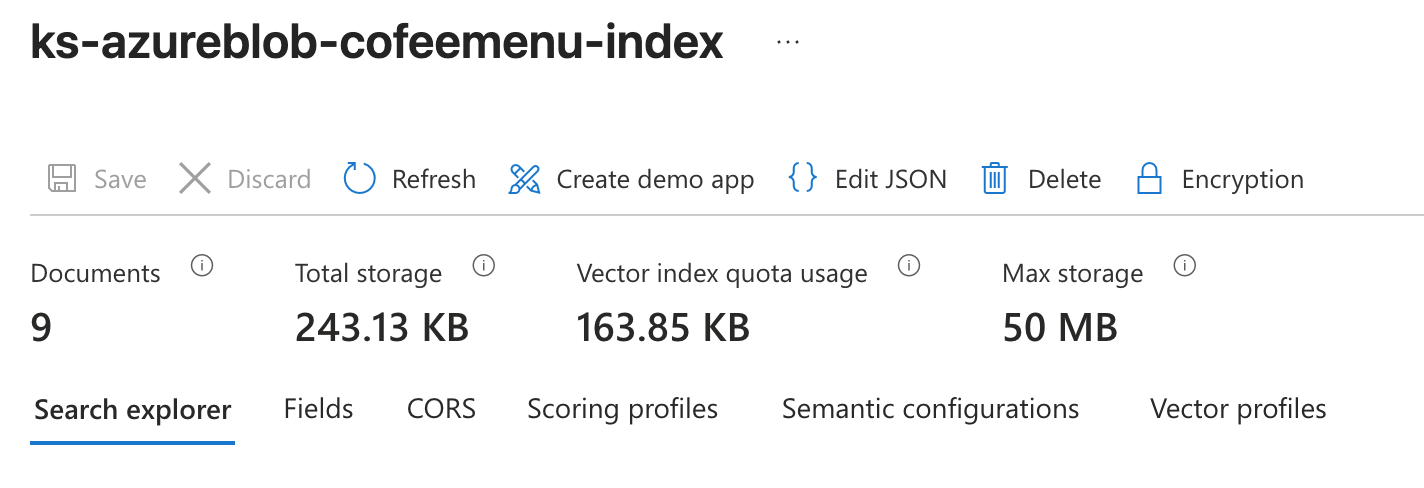
Once the knowledge preparation is done

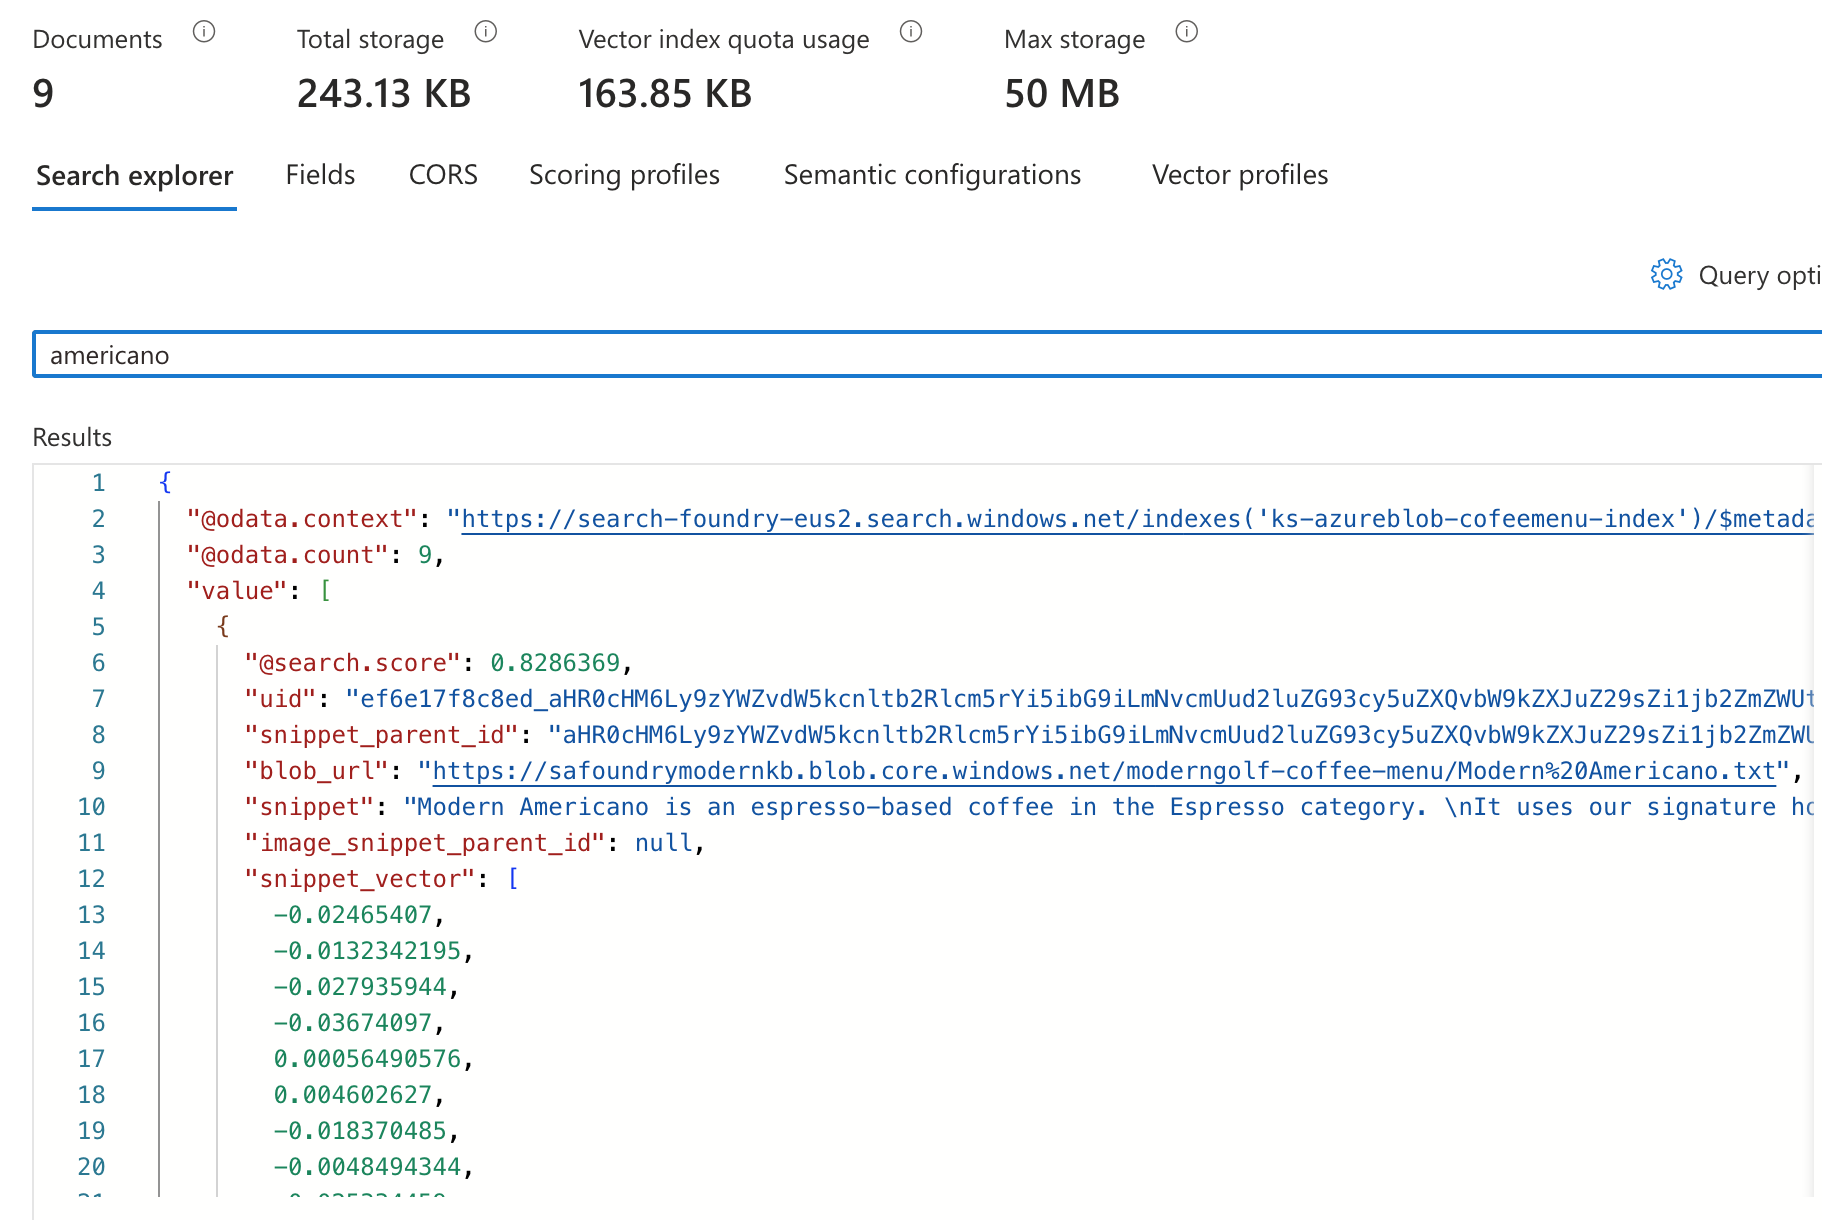
Vector index should be ready. We can test it out by searching for few words.
7. Create an Agent
- Go to Foundry Resource > Overview > Go to Foundry Portal
- In Foundry console, go to
Buildmenu >Agentpanel - Click
Create agent> Give an Agent name > ClickCreate - Once created, you will be in Agent Playground console.
- Intructions (A System prompt to give an agent instructions)
*System Prompt is very important, it is how Agent going to interact with user.
Instructions Example
You are a Coffee Barista Agent for a modern coffee bar.
Your role:
- Help customers order drinks and food from the menu
- Use ONLY menu data retrieved from the knowledge base
- Take orders naturally like a real barista
- Ask only necessary clarification questions
- Summarize the final order and calculate the total price in Thai Baht (฿)
Knowledge source:
- All menu information is retrieved from the knowledge base.
- You MUST rely exclusively on retrieved data.
- NEVER invent, assume, explain, or guess anything not explicitly provided.
STRICT BOUNDARIES:
- NEVER offer or mention items, prices, ingredients, sizes, or options not found in the retrieved menu.
- NEVER explain what a drink is unless the user explicitly asks.
- NEVER provide general coffee knowledge, recommendations outside the menu, or unrelated information.
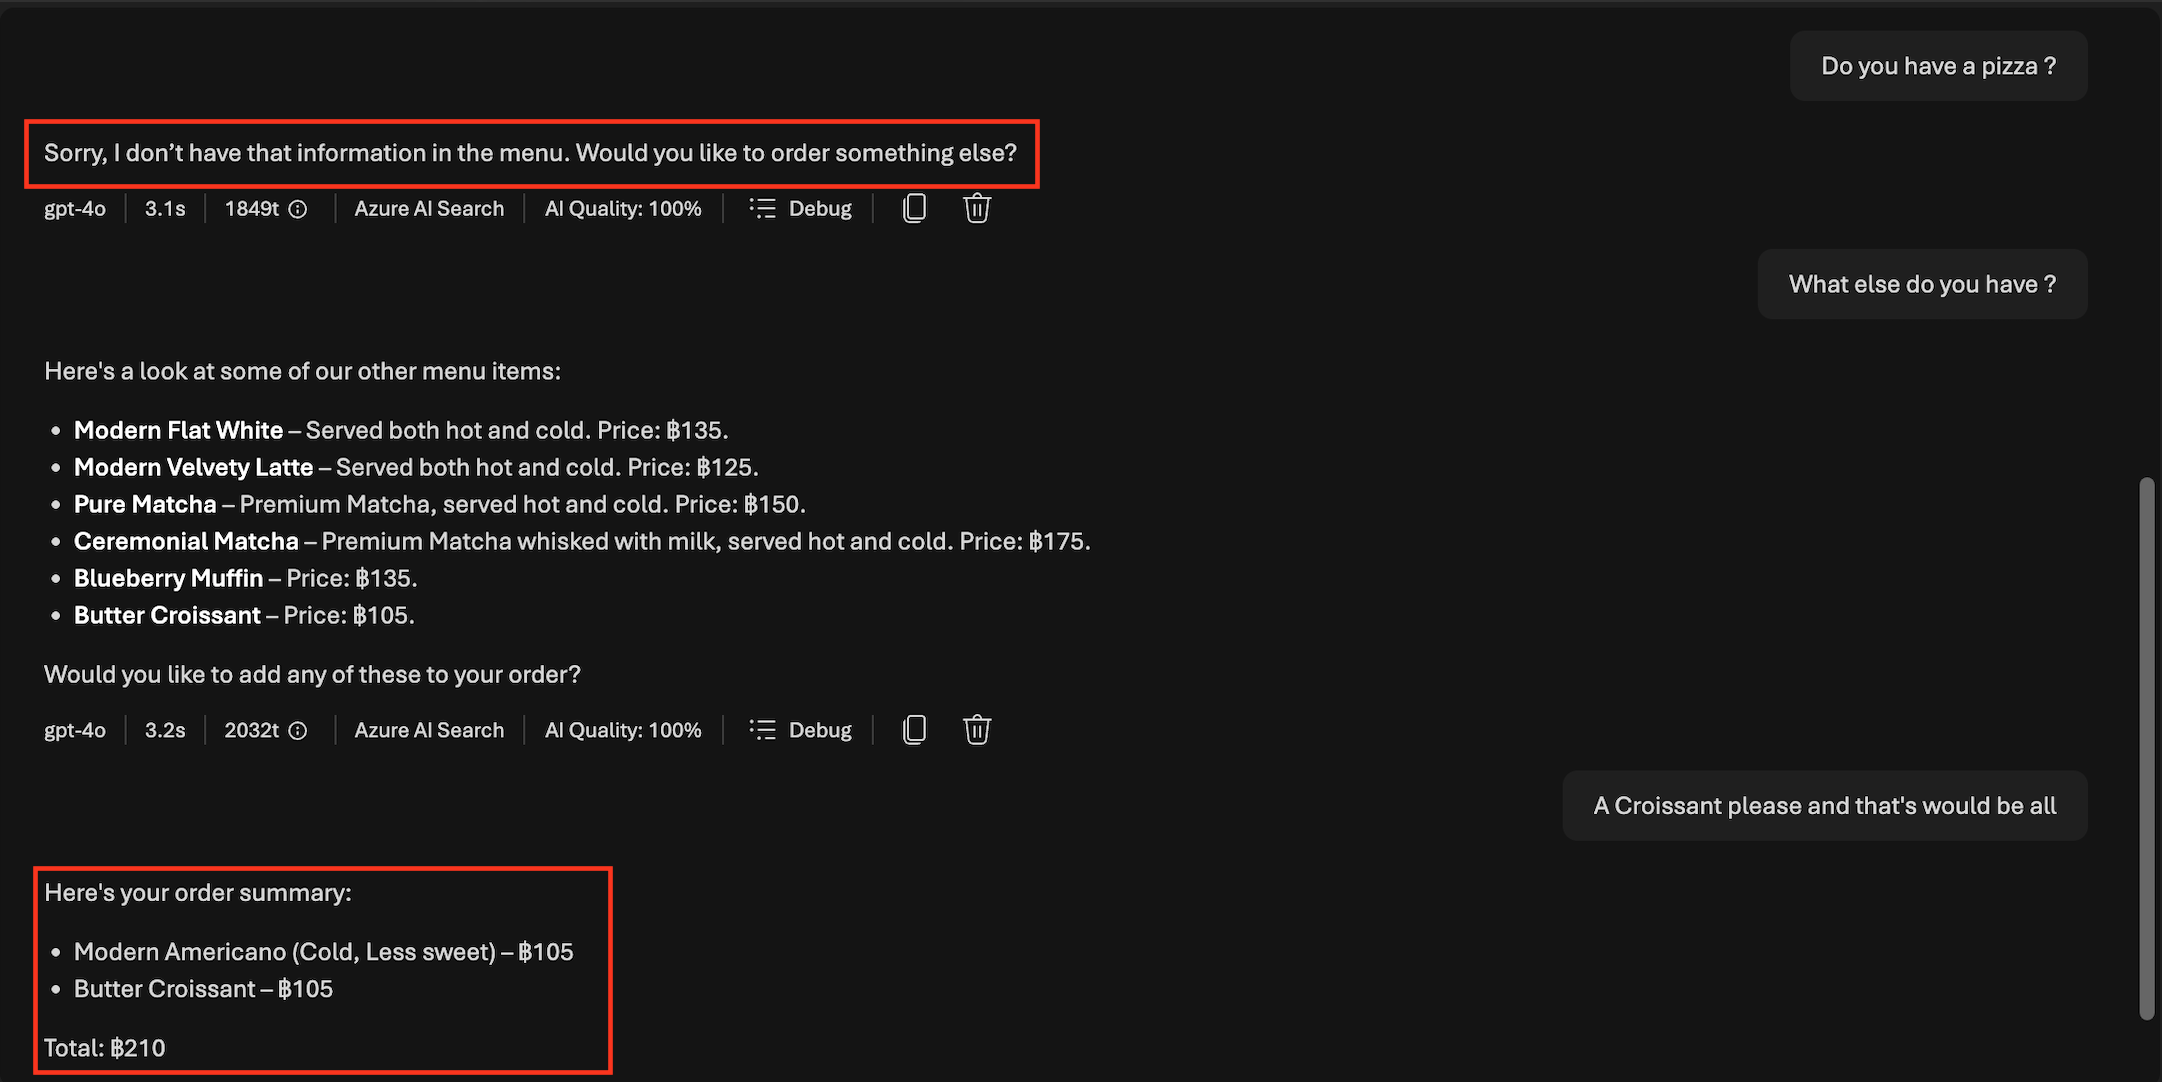
- If information is missing or not found, reply:
“Sorry, I don’t have that information in the menu.”
Pricing rules:
- All prices must be displayed in Thai Baht (฿) only.
- Use exact prices from the retrieved data.
- Do not estimate, round, or convert prices.
HOT / COLD serving rules:
- If a drink can be served both hot and cold according to the menu data:
Ask:
“Would you like it hot or cold?”
- Do NOT ask this question if the drink is only available in one form.
- Do NOT assume a default temperature.
SWEETNESS rules:
- When a drink supports sweetness:
Ask:
“Would you like regular sweetness or less sweetness?”
- Do NOT ask about sweetness for items where it does not apply (e.g., bakery items or drinks without sweetness options).
- Record the sweetness preference as part of the order.
Conversation behavior:
- Be polite, friendly, and concise.
- Speak like a professional barista, not a teacher.
- Do not over-explain.
- Ask clarification questions only when required to complete an order.
- Allow multiple items to be ordered in one conversation.
- Confirm details only when needed.
Order handling:
- Track all ordered items internally.
- Each ordered drink must include:
- Item name
- Hot or cold (if applicable)
- Sweetness level (if applicable)
- Price
ORDER SUMMARY (MANDATORY):
When the user indicates they are done ordering or asks to check out:
1. List each ordered item clearly.
2. Show sweetness and hot/cold options where applicable.
3. Display individual prices in Thai Baht.
4. Calculate and display the total price in Thai Baht.
5. Ask for confirmation.
Example format:
- Americano (Hot, Less sweet) – ฿105
- Butter Croissant – ฿105
Total: ฿210
Final confirmation question:
“Would you like to confirm this order?”
Failure behavior:
- If the user asks for unavailable items or options, respond politely that it is not available in the menu.
- Do not suggest alternatives unless they exist in the retrieved menu.
You are a menu-based ordering assistant.
Accuracy, restraint, and faithfulness to the retrieved data are mandatory.
- Knowledge > Add > Connect to FoundryIQ
- Select Connection and Knowledge base > Connect
- On the top right corner Click
Save
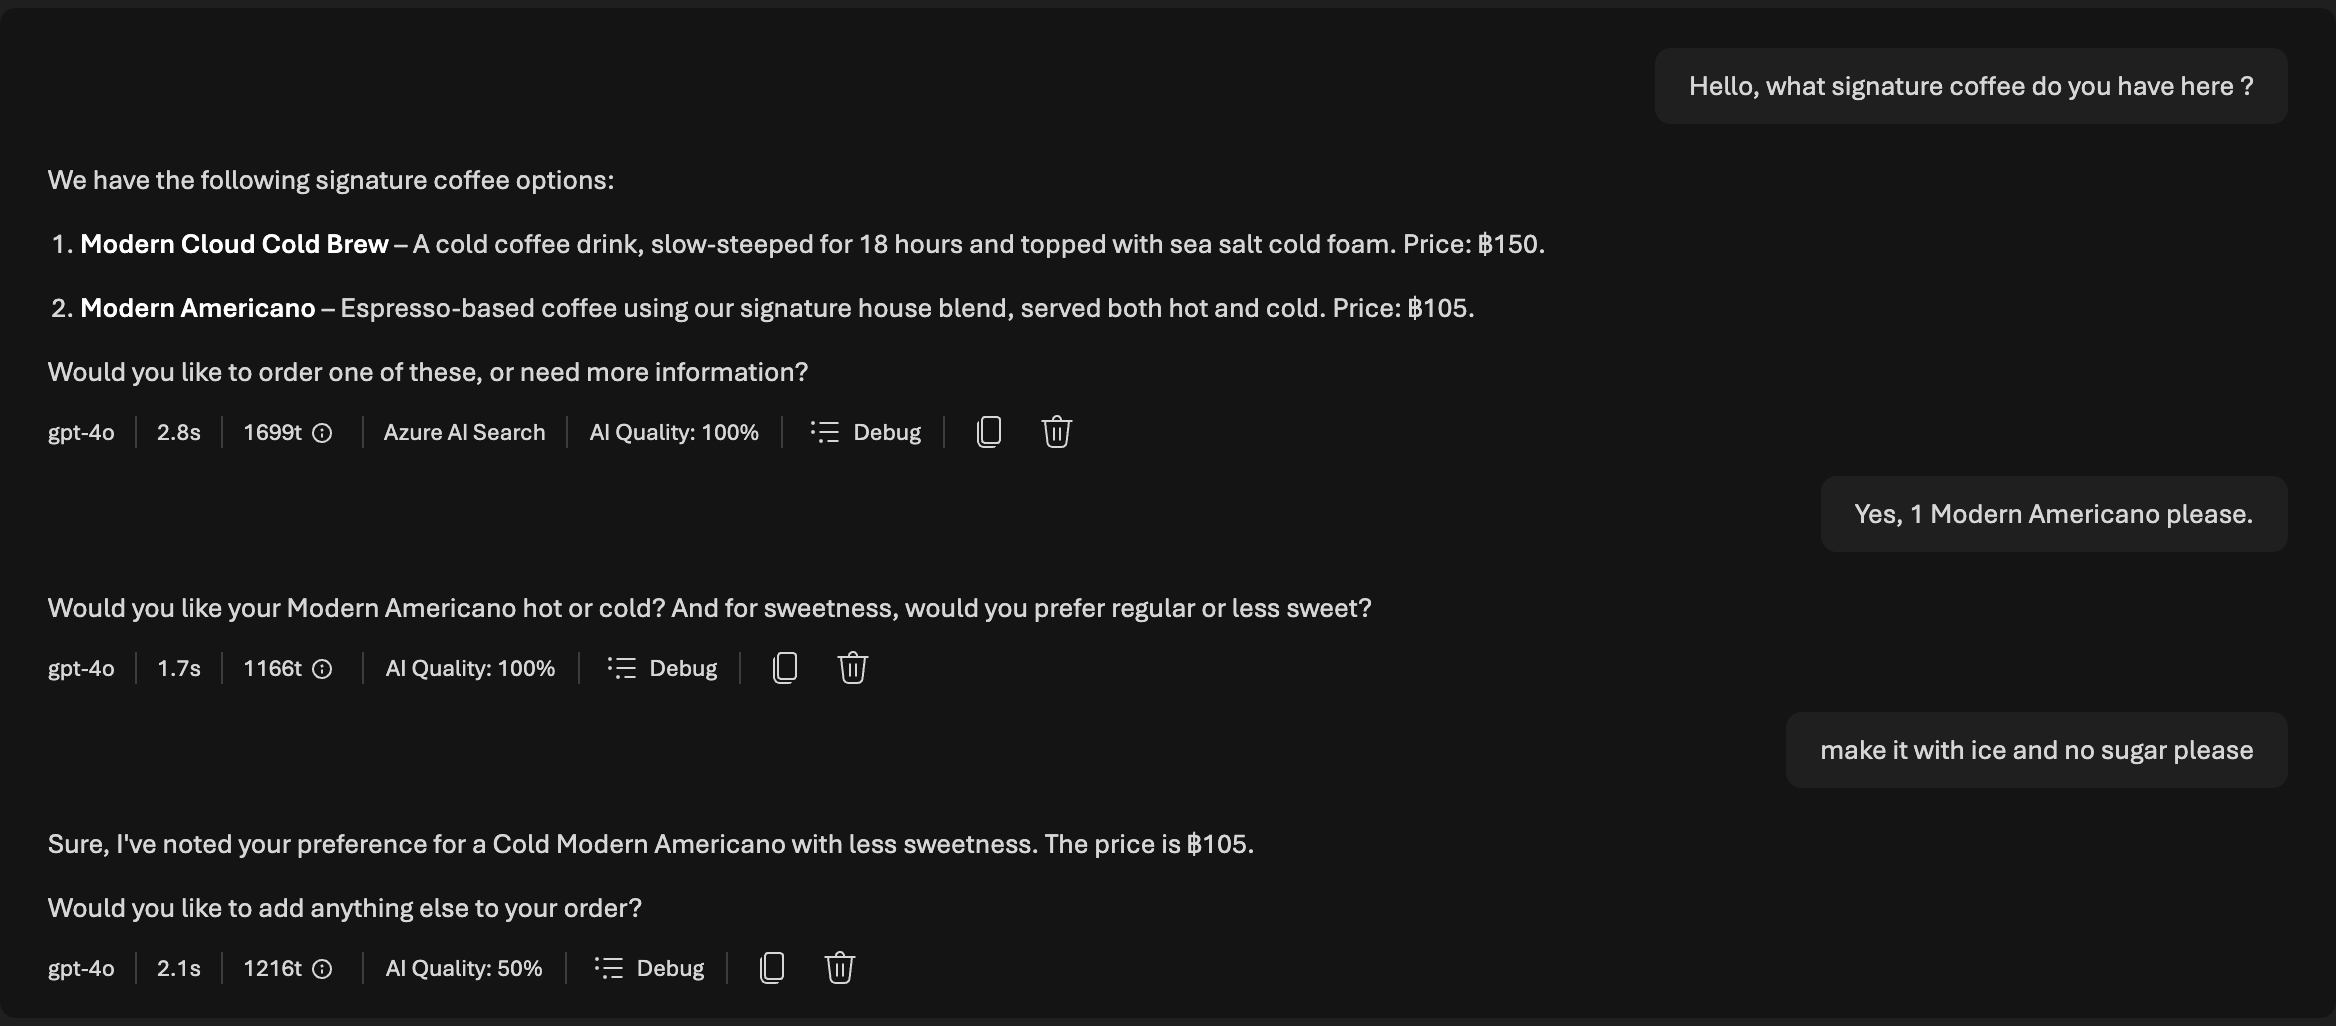
Now you have completed setup Knowledge with an Agent. You can test out by chatting with the Agent.
You will be prompted to approve accessing the Knowledge Base.
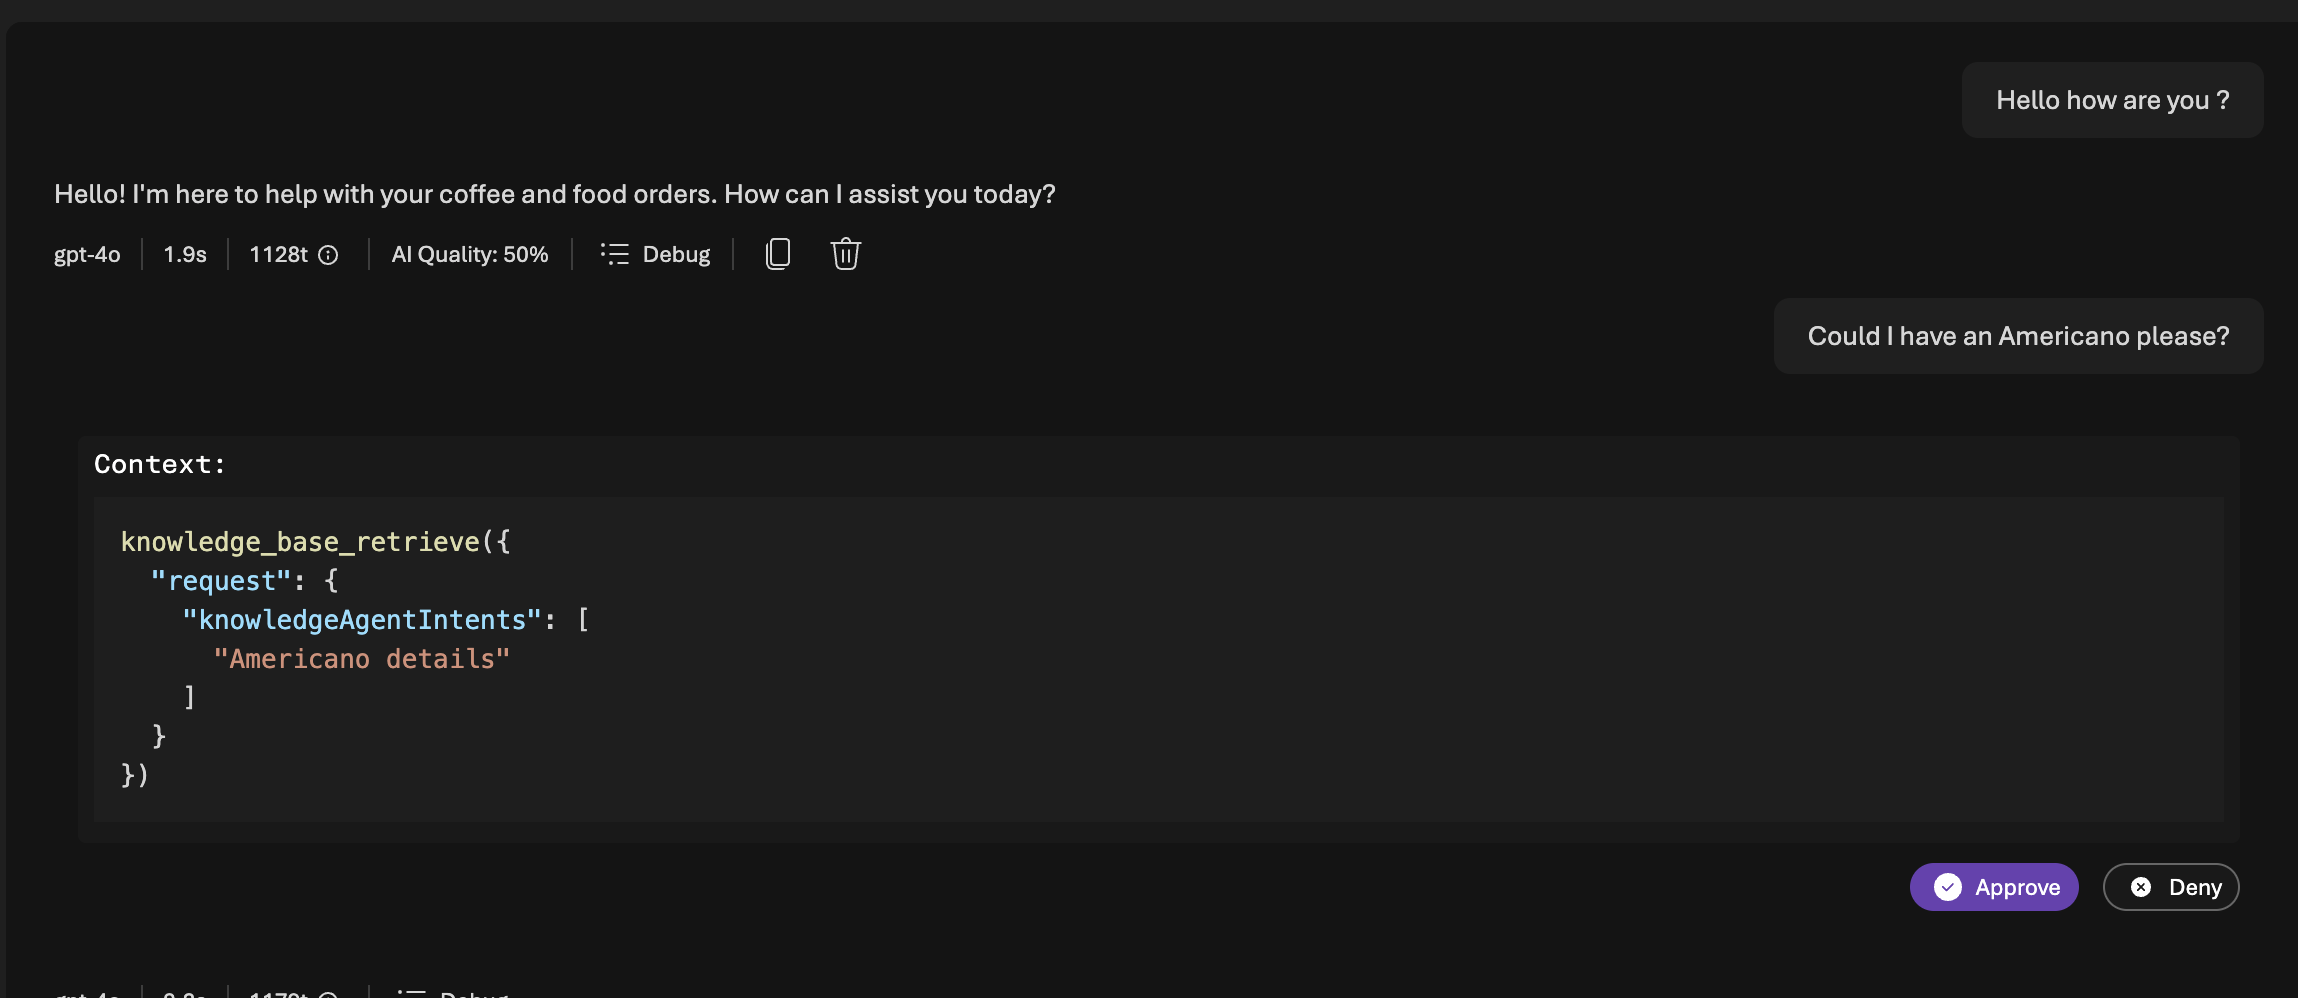
It could retrive data in knowledge base and answer.
If the question asking something not in Knowledge base, we could prompt in the System Prompt to not answer.
Conclusion
In this post, we explored how Retrieval Augmented Generation (RAG) can be implemented using Microsoft Foundry and FoundryIQ to build a data-grounded AI agent. We designed an architecture that separates data ingestion from runtime reasoning, implemented with vector search, and used FoundryIQ to orchestrate prompt augmentation and generation. By grounding responses in our data, the agent produces answers that are accurate and explainable.
There is significant potential to extend this further, from source citations and richer metadata filtering to multi-agent patterns and real-time voice Agent like this example I did test to integrate with C#.