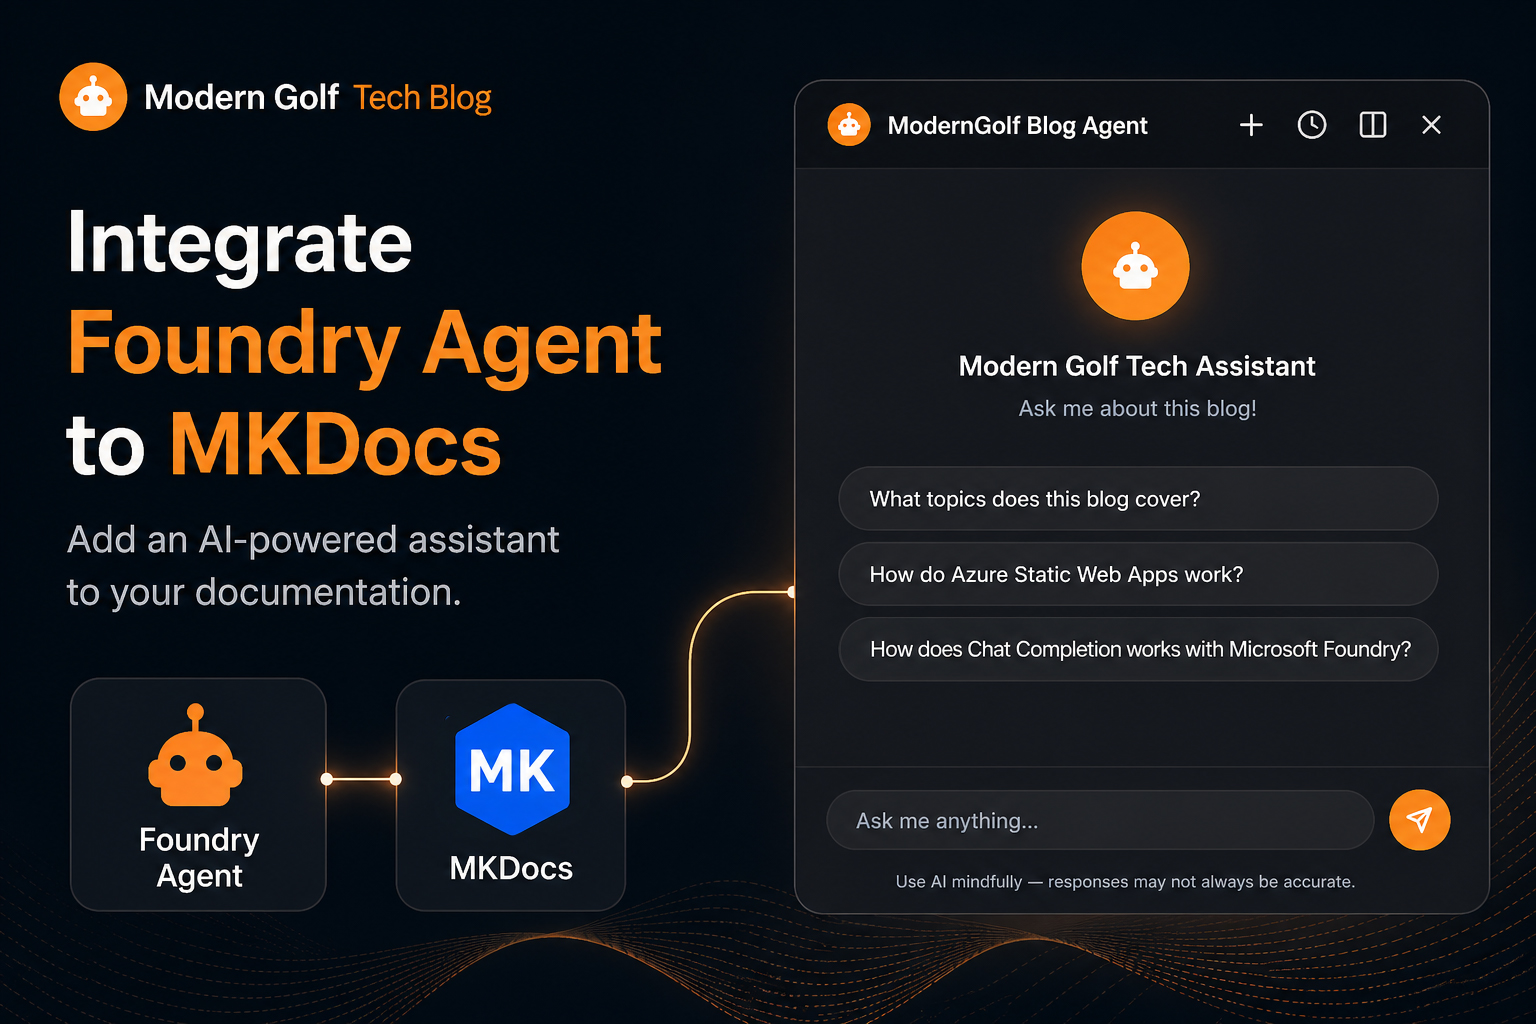
Integrate Foundry Agent to MKDocs
What if every reader of your blog could ask questions and get intelligent answers, grounded in what you actually wrote?
That was the idea behind adding an AI assistant to this very site. In this post I will walk through how I integrated a Microsoft Foundry Agent directly into MkDocs, turning a static blog into an interactive, AI-powered knowledge base.
Inspiration: This post was inspired by Integrating an AI Chatbot into Static Documentation — Technical Deep Dive by Wishula on Medium. That article sparked the idea of embedding a conversational AI layer on top of static documentation — I wanted to take a similar concept and build it end-to-end with Microsoft Foundry AI Agent.
What We Are Building
By the end of this setup, every page of the MkDocs site has a floating "Ask AI" button. Clicking it opens a chat panel (or a full split-view side-by-side with the page) powered by a Foundry Agent that has read every post on the blog.
The end-to-end stack looks like this:
- Azure AI Foundry — hosts the agent and the language model
- Azure AI Search — vector store for blog post chunks
- Azure Functions — CORS-safe proxy between the browser and Foundry
- MkDocs (Material theme) — the static site, with a custom chat UI injected via theme overrides
Architecture
Browser (MkDocs site)
        │
        │  POST /api/chat  (JSON: { input: [...messages] })
        ▼
┌─────────────────────────────┐
│  Azure Function             │
│  blog-chat-proxy      │
│  (chat-proxy/function_app)  │
│                             │
│  • Validates CORS origin    │
│  • Acquires Entra ID token  │
│    via Managed Identity     │
│  • Creates thread + run     │
│  • Polls until completed    │
│  • Returns assistant reply  │
└────────────┬────────────────┘
             │  Foundry REST API  (threads/runs)
             ▼
┌─────────────────────────────┐
│  Azure AI Foundry           │
│  proj-blog-agent      │
│                             │
│  Agent: asst_vAnSM3H…       │
│  ┌──────────────────────┐   │
│  │  Azure AI Search     │   │
│  │  blog-posts index    │   │
│  │  (vector + keyword)  │   │
│  └──────────────────────┘   │
└─────────────────────────────┘
Data flows in two directions:
Offline (CI/CD — indexing pipeline)
- Every push to
mainrunsscripts/index_posts.py - Each
.mdfile underdocs/posts/is parsed — frontmatter stripped, body chunked (~2,500 chars) - Chunks are embedded with
text-embedding-3-smallvia Azure OpenAI - Vectors + metadata (
title,categories,tags,date,url) are upserted to theblog-postsindex in Azure AI Search
Online (user chat)
- User types a question in the chat panel
- JavaScript (
chat.js+chatbot/index.html)POSTs the full conversation history to the Azure Function - The Function exchanges a Managed Identity token for a Foundry bearer token, creates a new thread, submits the run, and polls for completion
- The completed assistant message is returned as
{ "output_text": "..." }and rendered in the chat UI
1. Foundry Agent Design
Create the Project and Agent
In Microsoft Foundry, create a project (proj-blog-agent) inside your AI Services hub (blog-foundry-01).
Inside the project, create a new Agent:
- Model:
gpt-4o(or any chat-completion model available in your region) - Name:
blog-agent - Instructions: Give the agent a system prompt that tells it to answer questions based on the blog content, keep answers concise, and cite the relevant post when possible.
Example system prompt:
You are the Modern Golf Tech blog assistant.
Answer questions using the knowledge grounded from the blog posts.
Keep your answers concise and conversational.
When relevant, mention the post title where the information comes from.
If you don't know, say so — do not make things up.
Connect Azure AI Search as a Knowledge Tool
In the agent's Tools section, add an Azure AI Search tool:
- Index:
blog-posts - Semantic configuration: default
- Query type: vector + keyword hybrid
- Top-K: 5
This grounds the agent in your actual post content rather than general model knowledge.
2. Build the Search Index
Schema
The blog-posts index has these fields:
| Field | Type | Purpose |
|---|---|---|
id |
Edm.String (key) |
MD5 of post_id::chunk_id |
title |
Edm.String |
Post filename stem |
content |
Edm.String |
Raw markdown chunk |
content_vector |
Collection(Edm.Single) |
1536-dim embedding |
post_id |
Edm.String |
Post filename stem |
chunk_id |
Edm.Int32 |
Chunk sequence number |
categories |
Collection(Edm.String) |
From frontmatter |
tags |
Collection(Edm.String) |
From frontmatter |
date |
Edm.DateTimeOffset |
Publication date |
url |
Edm.String |
Canonical post URL |
The Indexing Script
scripts/index_posts.py does the heavy lifting:
POSTS_DIR  = Path(__file__).parent.parent / "docs" / "posts"
CHUNK_SIZE = 2500   # characters
EMB_BATCH  = 16     # texts per embedding API call
Key steps:
- Parse frontmatter with PyYAML — skips posts marked
draft: true - Chunk body text — splits on paragraph boundaries, falls back to hard wrap for oversized paragraphs
- Embed in batches — calls
text-embedding-3-small16 texts at a time with a 0.5 s delay between batches to stay within rate limits - Upsert to AI Search — uses
mergeOrUploadaction in batches of 100
Run it manually:
export AZURE_SEARCH_ENDPOINT="https://srch-blog-agent.search.windows.net"
export AZURE_SEARCH_ADMIN_KEY="<your-admin-key>"
export AZURE_OPENAI_ENDPOINT="https://blog-foundry-01.openai.azure.com"
export AZURE_OPENAI_API_KEY="<your-api-key>"
export AZURE_OPENAI_EMBEDDING_DEPLOYMENT="text-embedding-3-small"

python scripts/index_posts.py
Automated via CI/CD
The GitHub Actions workflow re-indexes automatically on every push to main, right after the MkDocs build:
- name: Refresh AI Search index
  if: github.event_name == 'push' && github.ref == 'refs/heads/main'
  env:
    AZURE_SEARCH_ENDPOINT: https://srch-blog-agent.search.windows.net
    AZURE_SEARCH_ADMIN_KEY: ${{ secrets.AZURE_SEARCH_ADMIN_KEY }}
    AZURE_OPENAI_ENDPOINT: https://blog-foundry-01.openai.azure.com
    AZURE_OPENAI_API_KEY: ${{ secrets.AZURE_OPENAI_API_KEY }}
    AZURE_OPENAI_EMBEDDING_DEPLOYMENT: text-embedding-3-small
  run: python scripts/index_posts.py
This means the search index is always in sync with the published posts — no manual steps required after writing a new post.
3. The Azure Function Proxy
A static website cannot call the Foundry REST API directly — the browser would need a bearer token, which must never be exposed client-side. The Azure Function solves this by acting as a CORS-safe, authenticated proxy.
Why a Proxy?
- Security: Bearer tokens stay server-side; only the Function URL is exposed to the browser
- CORS: The browser enforces same-origin policy; the Function adds the correct
Access-Control-Allow-Originheaders - Stateless threads: Each conversation is a fresh Foundry thread — created, used, then deleted in a single request cycle
Create and Deploy the Function
Step 1: Create the Azure Function App resource
- Create a new Function App named
blog-chat-proxy - Place it in resource group
rg-blog-agent - Use Python 3.11 as the runtime
- Set the region to
eastus2 - Attach your storage account for function state/logs
Step 2: Enable Managed Identity
- Assign a system-managed identity to the Function App
- This identity allows the function to authenticate with Azure services (like Foundry) without storing credentials
Step 3: Grant the identity access to Foundry
- Create a role assignment that allows the function's identity to act as an "Azure AI Developer"
- Scope the permission to your specific Foundry resource (
blog-foundry-01) - This lets the function acquire a bearer token to call the Foundry API
- You'll get a principal ID from Step 2 — use that as the
<principal-id-from-above>
Step 4: Deploy the function code
- Navigate to the
chat-proxy/folder - Publish the function to the Function App using the Azure Functions CLI
- This uploads your
function_app.pyand dependencies to Azure
How the Function Works
chat-proxy/function_app.py exposes a single HTTP route /api/chat.
@app.route(route="chat", methods=["GET", "POST"])
def chat_proxy(req: func.HttpRequest) -> func.HttpResponse:
    ...
The request body is:
{ "input": [{ "role": "user", "content": "What is RAG?" }] }
The function:
- Acquires a bearer token using
DefaultAzureCredential(resolves to the Managed Identity in production) - Creates a Foundry thread-and-run in a single API call (
POST threads/runs) - Polls every 5 seconds until the run reaches a terminal state (
completed,failed,cancelled,expired) — up to 3 minutes - Fetches the messages, extracts the first assistant reply, and returns
{ "output_text": "..." } - Always deletes the thread in a
finallyblock to avoid accumulating state
Application Settings
Configure these in the Function App settings (or local.settings.json for local dev):
| Setting | Value |
|---|---|
AZURE_AI_PROJECT_ENDPOINT |
https://blog-foundry-01.services.ai.azure.com/api/projects/proj-blog-agent |
AGENT_ID |
Agent ID from Foundry (e.g. asst_vAnSM3H…) |
ALLOWED_ORIGINS |
Comma-separated list of allowed frontend origins |
4. The Chat UI
The Chatbot Page (docs/assets/chatbot/index.html)
The chat UI lives as a standalone HTML page served as a static asset. It is embedded as an <iframe> inside the MkDocs site — this isolates its styles and scripts from the MkDocs theme completely.
The page handles:
- Light/dark mode (inherits from the parent page)
- Suggestion pills (pre-set questions shown on first load)
- Conversation history stored in
localStorage, keyed by session - Rendering the full response after each turn completes
- Markdown rendering in bot replies
- Sending the full message history to the Function on each turn (stateless backend, stateful frontend)
The Parent Page Orchestration (docs/assets/js/chat.js)
chat.js is included on every MkDocs page and manages the shell around the iframe:
- Floating toggle button — fixed bottom-right corner, opens/closes the chat panel
- Chat panel — slides up with a CSS transition, contains the iframe
- Split-view mode — the page content moves into a left-panel iframe, and the chat panel expands into a right panel — both resizable via a drag handle
- Session persistence — saves and restores conversation history across page navigations using
localStorage - Promotional popup — shows an "Ask AI" nudge after a few seconds on the first visit
MkDocs Theme Override (overrides/main.html)
The chat toggle button and panel are injected into every page by extending the MkDocs Material base template:
{% extends "base.html" %} {% block styles %} {{ super() }}
<!-- All chat panel CSS: toggle button, floating panel, split-view, resize handle -->
{% endblock %} {% block content %} {{ super() }}

<!-- Floating toggle button -->
<button id="site-chat-toggle" class="site-chat-toggle">...</button>

<!-- Floating chat panel with iframe -->
<div id="site-chat" class="site-chat">
  <div class="site-chat__body">
    <iframe src="/assets/chatbot/index.html"></iframe>
  </div>
</div>

<!-- Split-view container -->
<div id="split-view-container" class="split-view-container">...</div>

<script src="/assets/js/chat.js"></script>
{% endblock %}
No MkDocs plugin or Python code is needed — the entire chat feature is pure HTML/CSS/JS injected at build time through the theme override system.
Putting It All Together
Here is the full picture of what happens from a new post to a user conversation:
- Write post
- Push to main
- GitHub Actions: a. mkdocs build --clean → site/ b. python scripts/index_posts.py → Azure AI Search (blog-posts) c. Azure/static-web-apps-deploy → Azure Static Web Apps
- User visits blog site
- User clicks the 🤖 button
- Types: "How does RAG work?"
- chat.js → POST /api/chat → Azure Function
- Function → Foundry threads/runs → Agent grabs top-5 chunks from AI Search
- Agent replies → Function → Browser → Chat panel renders the answer
Every piece is serverless, managed, and scales to zero when idle — the running cost for a personal blog is essentially zero outside of active usage.
Summary
| Component | Role |
|---|---|
scripts/index_posts.py |
Parse, chunk, embed, and upsert posts to AI Search |
Azure AI Search blog-posts |
Vector + keyword index, knowledge grounding |
| Azure AI Foundry Agent | Language model + retrieval orchestration |
chat-proxy/function_app.py |
Authenticated CORS proxy to Foundry REST API |
docs/assets/chatbot/index.html |
Self-contained chat UI (iframe) |
docs/assets/js/chat.js |
Panel toggle, split-view, session management |
overrides/main.html |
Injects the chat shell into every MkDocs page |
| GitHub Actions workflow | Re-indexes on every push to main |
The result is a static blog that feels like it has a built-in expert — one that actually read all the posts.